I am always looking for new ways to reused what I already have on hand. For some reason, I had the idea of painting bubble wrap to give my gift bags and boxes a nice textured...almost beaded look. I was surprised how nice it came out. At first glance, it doesn't even look like bubble wrap. I created this heart gift box out of a tissue box where I cut out hearts shapes on all sides and decorated with my painted bubble wrap.
Materials
- Tissue Box
- Bubble Wrap
- Foam Brush
- Acrylic Paint
- Gold Cord
- Craft Glue
- Tissue or Decorative Mesh Fabric

- For box design, cut off the top of a tissue box and cut the top edges into a heart shape on all sides of the box. It is best if you make a heart pattern to fit the box because you will be using it to cut out the bubble wrap as well.
- Paint the heart box light pink.
- Paint the bubble wrap with the foam brush. It is nice how the paint only attaches to the bubbles.
- Tissue Box
- Bubble Wrap
- Foam Brush
- Acrylic Paint
- Gold Cord
- Craft Glue
- Tissue or Decorative Mesh Fabric
- For box design, cut off the top of a tissue box and cut the top edges into a heart shape on all sides of the box. It is best if you make a heart pattern to fit the box because you will be using it to cut out the bubble wrap as well.
- Paint the heart box light pink.
- Paint the bubble wrap with the foam brush. It is nice how the paint only attaches to the bubbles.
- Cut out four heart shapes to match the ones cut out on the box and attach with craft glue.
- Glue the gold cord around the heart to outline the heart.
- Fill the box with tissue or decorative mesh fabric.
- Cut out four heart shapes to match the ones cut out on the box and attach with craft glue
- Glue the gold cord around the heart to outline the heart.
- Fill the box with tissue or decorative mesh fabric.
I am always looking for new ways to reused what I already have on hand. For some reason, I had the idea of painting bubble wrap to give my gift bags and boxes a nice textured...almost beaded look. I was surprised how nice it came out. At first glance, it doesn't even look like bubble wrap. I created this heart gift box out of a tissue box where I cut out hearts shapes on all sides and decorated with my painted bubble wrap.
Materials
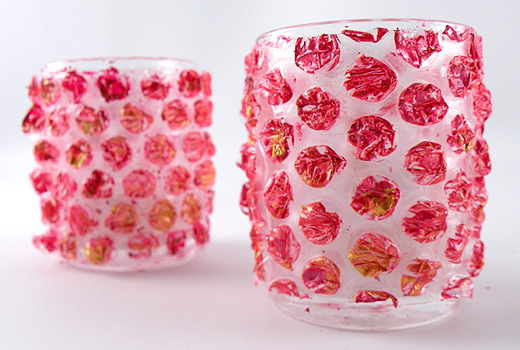
I liked the look of the painted bubble wrap so much that I also used it to cover votive candle holders. They have such a pretty glow when the lights are dimmed.
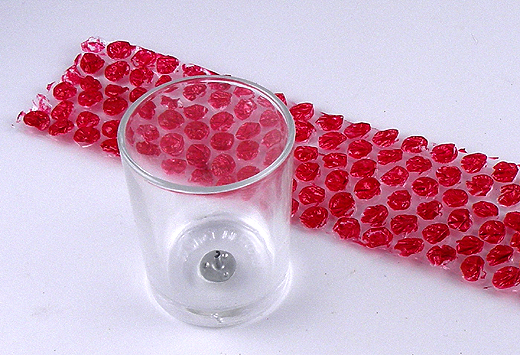
Paint a strip of bubble wrap the size to wrap around the votive candle. Attach it to the votive with double-sided tape. I only use battery tea lights with these because I don't want to risk melting the bubble wrap.

I liked the look of the painted bubble wrap so much that I also used it to cover votive candle holders. They have such a pretty glow when the lights are dimmed.
Paint a strip of bubble wrap the size to wrap around the votive candle. Attach it to the votive with double-sided tape. I only use battery tea lights with these because I don't want to risk melting the bubble wrap.